 Illustration: Keith Milne
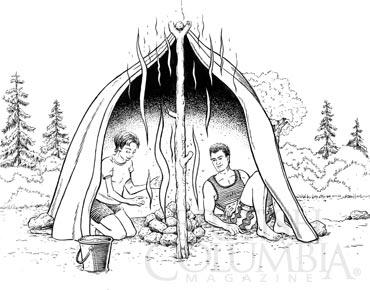
Temporary camp saunas can be a welcome comfort in the wilderness after a day of trekking or paddling. They take a few hours to complete, but enthusiasts attest they’re well worth the effort. Opinions vary on the best technique to employ, but here are the basic principles of sauna construction to get you started. (Note: never build a sauna on dry terrain or if the fire hazard is high.)
- Select a site near a fresh, clear water supply. Construct a frame using tent poles and tarps or a large rain fly. Alternatively, outdoorsman Wes Gietz of Comox (windwalker.ca) suggests finding a tree with branches swooping close to the ground and using those to frame the structure. Secure the edges of the tarp against the ground. The sauna should be just big enough to accommodate you and a few friends with room to sit back comfortably from the stone pile. Finally, dig a pit in the centre of the sauna for the heated rocks to rest in.
- Gather dry, fist-sized rocks to be heated (rocks containing water may explode when heated). “The best stones are porous lava rocks; basalt is also good,” recommends Gietz. “Avoid speckled crystalline rocks such as black or pink granite, as they will crumble into coarse sand in a hot fire.” Build a fire on top of the rock pile, away from the sauna structure, and keep the rocks completely covered with burning wood. It takes about an hour in a good fire for the rocks to turn red-hot.
- Carefully transfer the heated rocks into a pot and then into the sauna’s pit, or transfer them one at a time using a shovel or tongs. Sprinkle a little water from a bucket onto the hot stones to create steam, being careful not to scald yourself. Salt water, or water that contains visible organic material, is not recommended. Adjust the amount of water based on how much steam and heat you desire. The steam will cause your tarp cover to billow up as though inflated.